

At some point, you’ll probably deal with electrical work that involves wet areas, such as garages, basements, or outdoor spaces. That’s where a metallic or non-metallic liquid tight conduit comes in. This stuff protects your wiring from water and other rough conditions.
However, figuring out how to connect a liquid tight conduit to an electrical box can feel a little intimidating if you’ve never done it before. At Sonic Electric, we have helped homeowners, contractors, and pros across the country get the right tools and supplies for jobs just like this.
Why Liquid Tight Conduit Matters
Liquid tight conduit is flexible and covers your wires like a protective sleeve. If you’re running cable in a place that might get wet or dirty, this is what you want to use. It gives your wiring the cover it needs while still letting you bend it into tight spaces or corners without cracking or breaking.
You might see this type of metallic liquid tight conduit under sinks, along garage walls, or outside around AC units. Once you get the hang of putting it together, you’ll be able to handle similar tasks with way more confidence.
Pick the Right Connector Before You Start
Before doing anything else, you need to pick the right connector for your conduit. You will find different types out there: straight connectors, non-metallic liquid tight 90° connectors, and even ones that can spin. What you choose depends on where you're working. Tight corners? Go with an angled connector. Running the conduit in a straight line into a box? Then a straight one works just fine.
The connector makes sure the conduit holds tight to the electrical box. It also keeps water and dirt from sneaking in. Without the right connector, the job won’t work as it should.
Cut the Conduit the Right Way
Grab a sharp hacksaw or a conduit cutter. Don’t rush this part. Measure how much conduit you need, then make a clean cut. After cutting, check the ends. If they’re sharp or have little metal pieces sticking out, file them down. Smooth edges matter because they stop your connector from getting damaged and make the whole setup more secure. Filing takes just a few seconds and makes a big difference.
Slide on the Connector like a Pro
Once the conduit is cut and clean, slide your connector into place. You should feel some resistance, but it needs to fit snugly. If it’s wobbly, double-check that you’re using the right size. There should be no play between the connector and the conduit. This is where it helps to work on a flat surface and take your time.
If you’re using a connector with a sealing ring, make sure it’s on before you push it in. You want everything to line up nicely so the connection lasts.
Lock It Down
With the connector in place, it’s time to tighten things up. Use your hand to start, then finish it off with a wrench. Don’t overtighten, or you might crack the connector or squish the conduit too much. You want it tight enough to stay put without damaging anything. If your connector has a locknut or sealing ring, tighten that next.
Every part should feel secure but not strained. This part is often where leaks happen, so double-check everything before moving on.
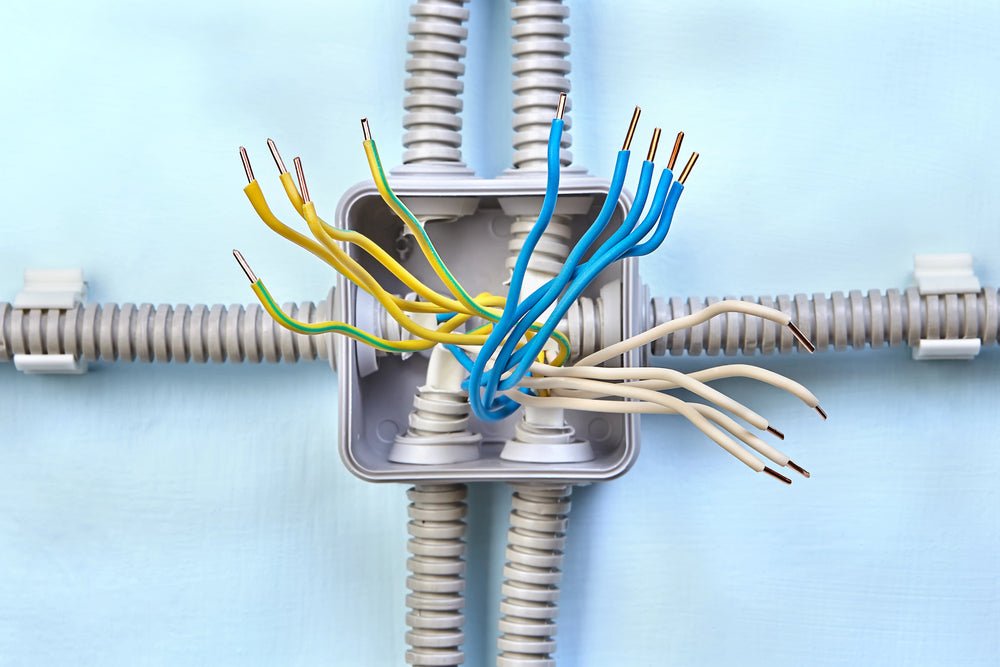
Connecting to the Electrical Box
Now, you are ready for the final part. Take your conduit with the connector attached and thread it into the knockout hole of your electrical box. If your connector screws in, twist it gently by hand until it stops, then tighten it with a wrench.
Don’t forget to check for gaps between the box and the connector. Everything should sit flush. If something doesn’t look or feel right, stop and adjust it. This isn't a step you want to rush.
Take a Second Look
You’re almost done. Step back and check everything. Is the conduit straight? Are the fittings snug? Give the conduit a gentle tug. If it holds firm, you’re good. If it slips or feels loose, go back and tighten things up. Look at where the conduit meets the box. If there are any visible gaps, something’s off. Doing this check now saves a lot of headaches later.
When it comes to liquid tight conduit installation, it is more about patience than skill. Follow the steps, double-check your fittings, and don’t cut corners. The process stays the same no matter how fancy your project is. Once you’ve done it once or twice, it gets easier.
Essential Tips for a Successful Installation
Ensure that your tools are readily available, including a conduit cutter, a wrench, and, if necessary, a file. If working outdoors or in a garage, be sure to bring a flashlight or work lamp, as proper lighting is essential for ensuring all components are properly secured and that no steps are overlooked.
Additionally, always wear gloves to protect your hands, as metal conduit edges can be sharp, particularly immediately after cutting. It is also important to avoid reusing connectors. If a connector is damaged or worn, replace it with a new one, as a faulty connector can compromise the entire installation.
One Last Thing About Connectors
You might wonder how to install liquid tight conduit connectors if your project involves a few different box sizes or angles. In that case, it’s all about matching your connector type to the spot you’re working on. Straight connectors for open spaces, right-angle ones for corners or tight walls, and swivel types if you need a little give. Always test-fit before locking things down.
Why We Are the Right Choice
At Sonic Electric, we’ve seen every kind of electrical setup you can imagine. From small home jobs to big commercial projects, we stock the tools, parts, and fittings you need to get things right the first time. We also make it easy to get what you need quickly, thanks to our big inventory and smart delivery network.
Our team knows what we are doing, and we are here to help you figure it out, too. No guesswork, no running back and forth to find a part that fits. You get real answers, fast shipping, and top-quality parts every time you order.
If you’re still wondering about your setup or want to talk through your next project, we’re happy to help. Contact us today and one of our team members will get back to you right away.


Share:
How Many Recessed Lights Do You Need?
New Uni-PAK to aid compliance with 2020 NEC